Terrace guide
Laying terrace slabs: gravel, pedestals or mortar?
The right installation method depends on the base, not on taste: a gravel bed is the affordable standard on natural ground, pedestals are ideal on concrete and roof terraces, drainage mortar is the rigid option for maximum stability. Add three rules that apply to all: about 2 % slope away from the house, wider joints than indoors and a solid edge restraint. floorplanning.app helps you plan the area, slab grid and pedestal points in advance.
The planning tool opens after free sign-up.
By the floorplanning.app editorial team
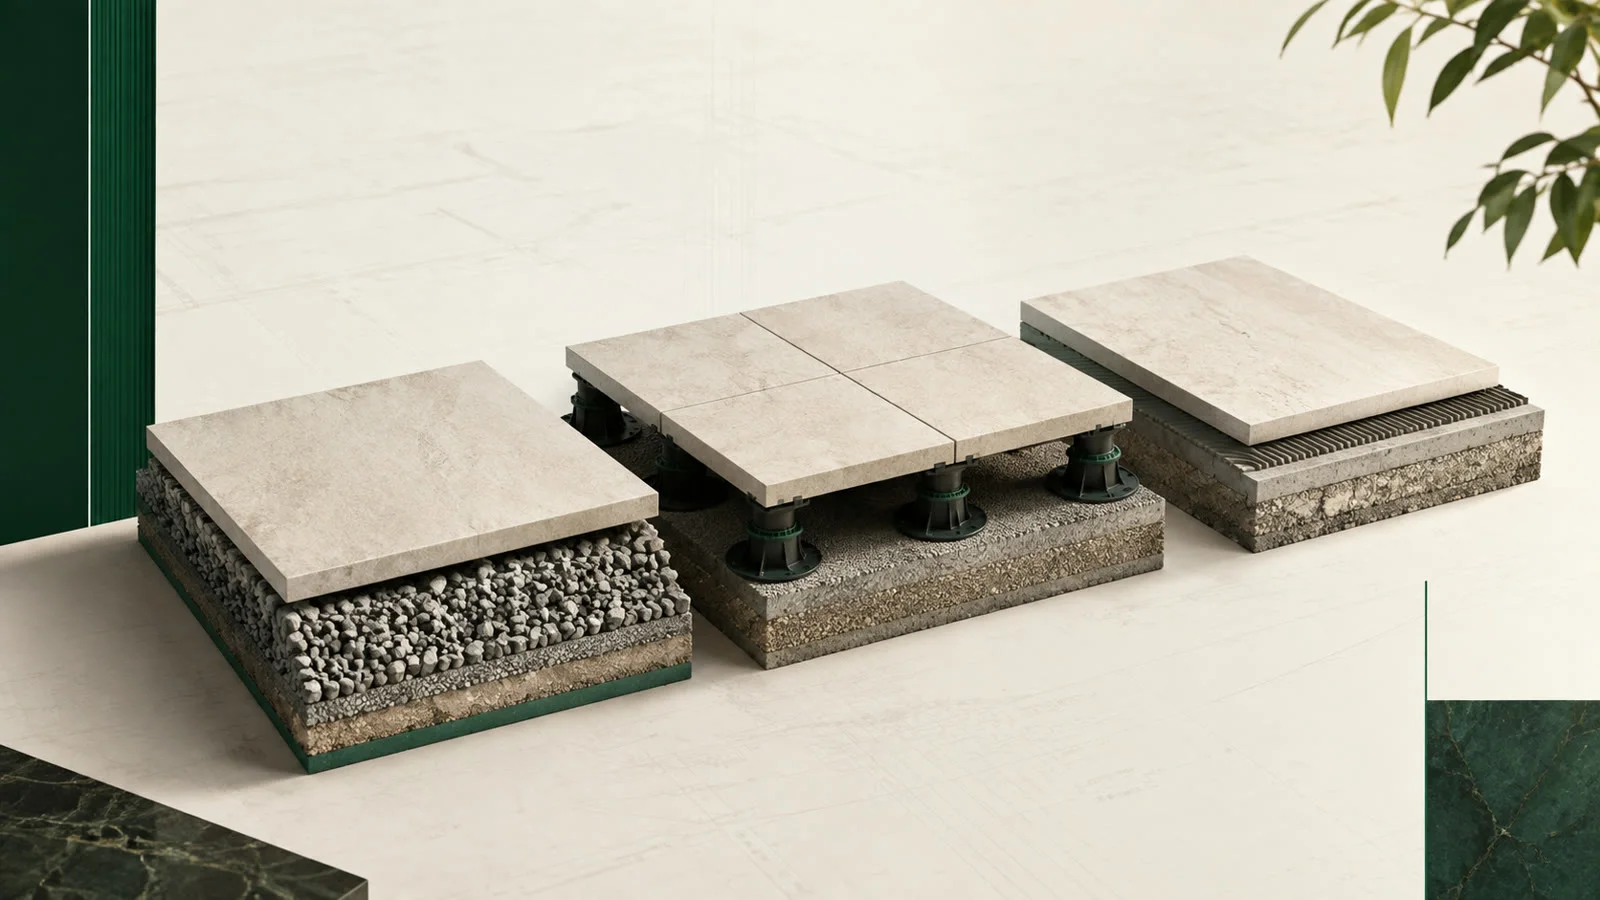
The three installation methods compared
Gravel bed: affordable, permeable, good on natural load-bearing ground – but needs a proper sub-base. Pedestals: perfect on concrete slabs, balconies and roof terraces, because you level heights to the millimetre and can always reach the waterproofing. Drainage mortar: the rigid, durable solution when maximum stability is required – but more effort and hardly reversible. Choose by base, not by chance.

What matters in practice
Without slope, water stands
Indoors you want everything level – outdoors exactly that is a mistake. Plan about 2 % slope away from the house, roughly 2 cm per metre, and build it into the sub-base, not into the slabs. With pedestals, self-levelling heads handle the compensation. Rain drains away instead of leaving puddles and frost damage.
Wider joints, 2 cm slabs, solid edge
Outdoors the material moves more: plan 3–5 mm joints and use spacer crosses so slabs have room to expand. Use 2 cm thick terrace slabs – thin indoor tiles break on point support. And plan the edge restraint from the start: kerbstones, edge rails or a concrete haunch hold the surface together, otherwise the outer slabs wander.
When point support is not enough: pedestals with rails
A rail frame can be appropriate when the slab or system manufacturer specifies line support, or when additional stiffness and clearly defined load paths are required: aluminium profiles sit on the pedestal heads and the slabs rest along the rails. Loads are distributed across several supports and the surface can be levelled through the pedestal heads. There is no universal slab-size threshold; approval for the slab, span and load is always decisive. In the tool you enable rails in the Pedestals tab: supports are conservatively placed directly below the rails no more than 50 cm apart, rail spacing is suggested from the slab format, and the calculator derives rail lengths and piece counts from the area geometry.

Count pedestals in advance instead of reordering
If you go with pedestals, the tool calculates the support points directly from your slab grid: corners, edge and interior points listed separately. You order the right quantity in one go – including the points at cut slabs that are almost always forgotten in rough estimates.
What terraces really fail on
Rarely on the slabs, almost always on the base: wrong installation method for the ground, missing slope, joints too narrow or an edge that does not hold the surface. Clarify these four points before the first slab and you lay once – and the terrace stays level and dry.
- Gravel bed on natural ground, pedestals on concrete and roofs, mortar for maximum stability
- About 2 % slope away from the house, built into the sub-base
- Joints 3–5 mm and slabs 2 cm thick
- Plan the edge restraint from the start
How to proceed
1. Determine base
Natural ground, concrete slab or roof terrace? That decides the method.
2. Plan area
Create the terrace on the floor plan and check the slab grid with joints.
3. Calculate quantities
Evaluate slabs, pedestal points and edging in one project.
Examples from the tool
This is what it looks like planned out
The numbers above do not come from a spreadsheet but from a real layout. You can open these example projects directly – floor plan, laying plan and material list, exactly as the tool outputs them.

Opens the read-only client view of a share – the same one you create for your own projects with Premium.
Common questions
Which method is right for a roof terrace?
Pedestals. They load the waterproofing only at points, level heights, let water drain freely and you can always access the roof membrane for maintenance. Gravel and mortar are usually ruled out on roofs by weight alone.
How much slope does a terrace need?
About 2 % away from the house – roughly 2 cm per metre. The slope belongs in the sub-base; the slab surface then follows it automatically. With pedestals, self-levelling heads handle the compensation.
What joint width is right outdoors?
Usually 3–5 mm, considerably more than indoors. Slabs expand in heat and otherwise press against each other until edges chip. Spacer crosses keep the gap even.
Can I lay normal indoor tiles on a terrace?
No. Outdoors you need frost-proof slabs 2 cm thick with an adequate slip rating. Thin indoor tiles are fully bonded indoors – on gravel or pedestals they break under load.
How many pedestals does a terrace of this size need?
In the example terrace above – 20.78 m² in a 60 × 60 format with a 1.5% slope – there are 97 support points: corners, edge points and interior points, each counted individually and drawn into the plan. As a rough figure, 60 cm slabs land at a good four to five pedestals per square metre. The exact number depends on cuts and edge handling, which is why the tool derives it from the actual layout instead of from the area.
What are rails when laying on pedestals?
Rails (traverse profiles) are aluminium profiles running in parallel lines under the surface, snapping onto special pedestal heads. The slabs are then supported along lines instead of at points. This can be useful for approved large formats, higher loads or desired additional stiffness; the tested assembly specified by the slab and system manufacturers remains binding. The tool suggests rail spacing from the slab format, cuts the rails to the geometry and lists total length, piece count and the pedestals underneath.
Related calculators & guides
- Pedestal calculator for terrace slabsUse a pedestal paver calculator for terrace slabs: plan supports at corners, edges, and in the field, then get a reliable material quantity.
- Plan a rail system technicallyPlan aluminium rails on pedestals correctly: calculate rail and support spacing, perimeter support, cutouts, profile pieces and connectors.
- Pedestals or a rail system?Compare pedestal pavers and rail systems for terrace slabs: support, spacing, edge details, and the manufacturer limits that decide.
- How many terrace slabs do I need?Calculate how many terrace slabs you need: count edge and corner cuts, include waste, and estimate the right quantity before ordering.
- Terrace tile calculatorPlan terrace tiles on your floor plan, compare layouts, and calculate material needs accurately, including cuts, waste, and reserve.
Plan your terrace now
Create the area, check the slab grid and calculate pedestal points automatically if needed.
The planning tool opens after free sign-up.